
There are times when you just can’t find the right tool for the job. So you take the closest candidate, shape it to size, and get to work.
3mm allen keys run about thirty cents apiece. Just remember to toss a few in the shopping cart next time.
Discoveries in the Physics & Astronomy shop | Science, curiosities, and surprises
There are times when you just can’t find the right tool for the job. So you take the closest candidate, shape it to size, and get to work.
3mm allen keys run about thirty cents apiece. Just remember to toss a few in the shopping cart next time.
There are endless options for measuring sizes, and we use different tools for different purposes. Rulers, meter sticks, tape measures? Check. Vernier calipers, both mechanical and digital? Check. Precision micrometers? Check.
Counting twelve-inch floor tiles? Check.
Precision matters, as does scale. A tape measure is helpful when moving furniture, even if it can’t determine the thickness of a sheet of paper like a micrometer can. Micrometers: really useless for determining if that new cabinet’s going to fit beside the CNC machine.
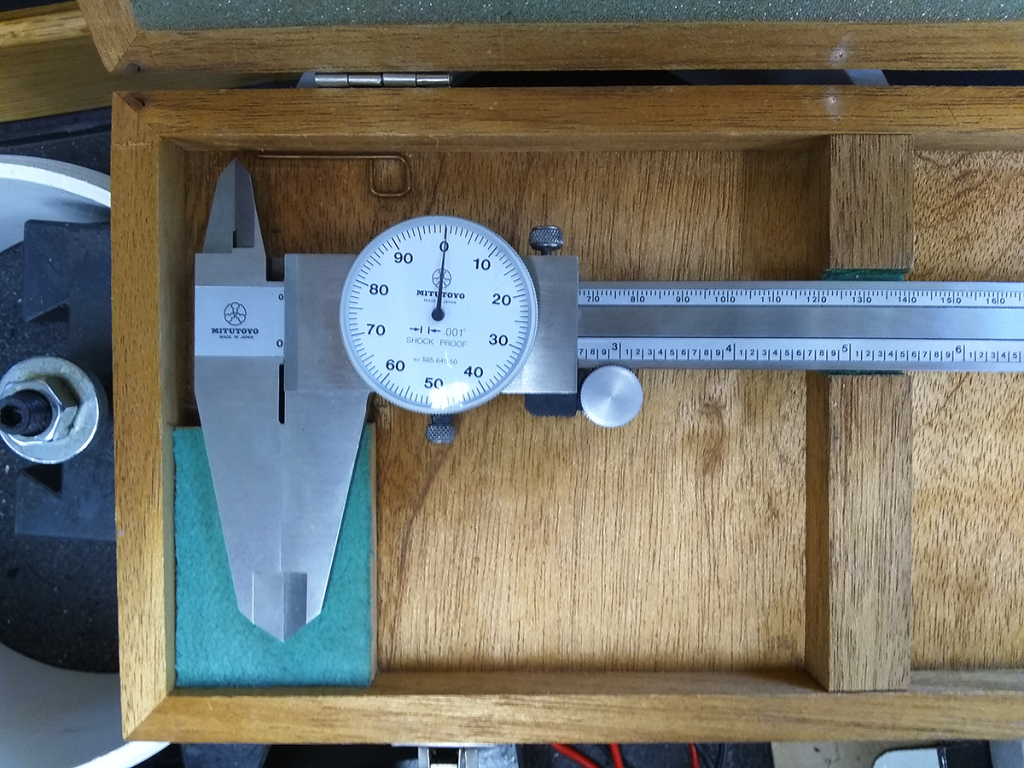
These Mitutoyo dial calipers – good for up to 12 inches in 0.001-inch increments – are kind of like a super-precise ruler. They’re in decimal inches, not metric, which makes them ideal for use with our lathe: also inch-only. (The calipers are more precise, so you know when you’re off by 0.003 inches.)
Not that we need that level of precision machining every day. But it’s good to know the option’s on the table.
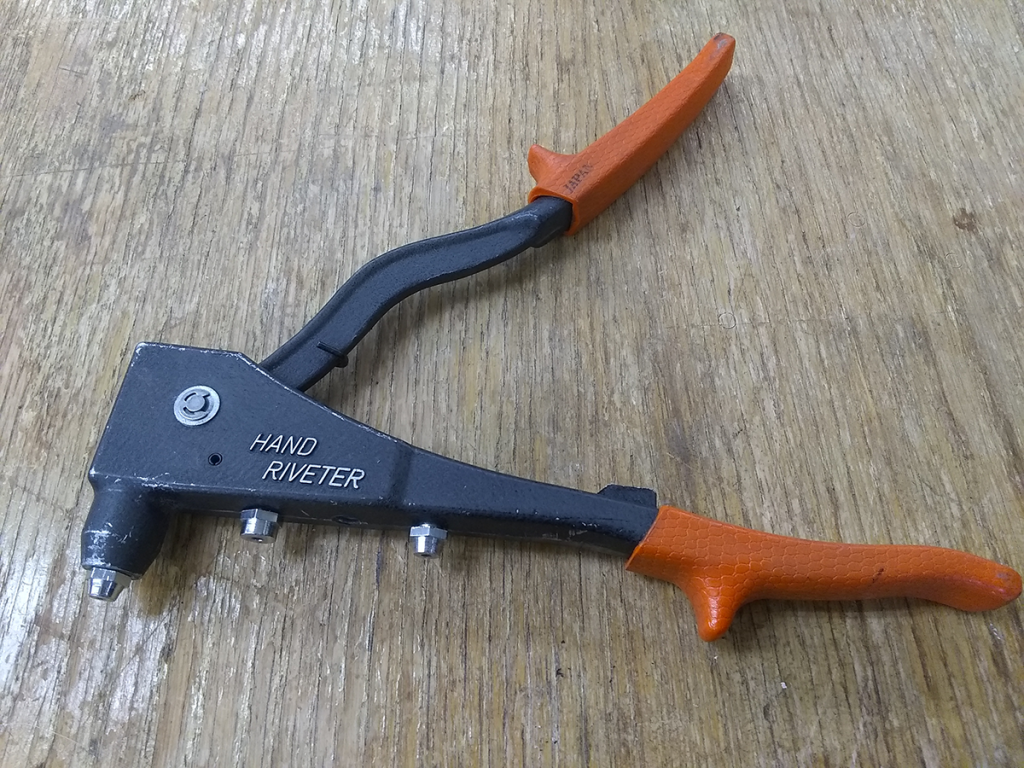
Pop rivets haven’t seen much use in the shop of late, but they always remain an option. You put one in the nosepiece of the tool, slide through a pre-drilled hole, and squeeze the handles. That action draws the rod and bead back to the tool, deforming the rivet to compress your materials together as the bead on the far side “pops” off. Can be handy, especially when you can’t access the other side of something easily.
This one was acquired at the tail end of the 1970s, for the not-insignificant sum of $25, or $100.54 today. You can pick up the equivalent tool from McMaster-Carr with delivery tomorrow for $31.25 plus shipping, whatever that tells you about the current state of the economy. Don’t read too much into it.
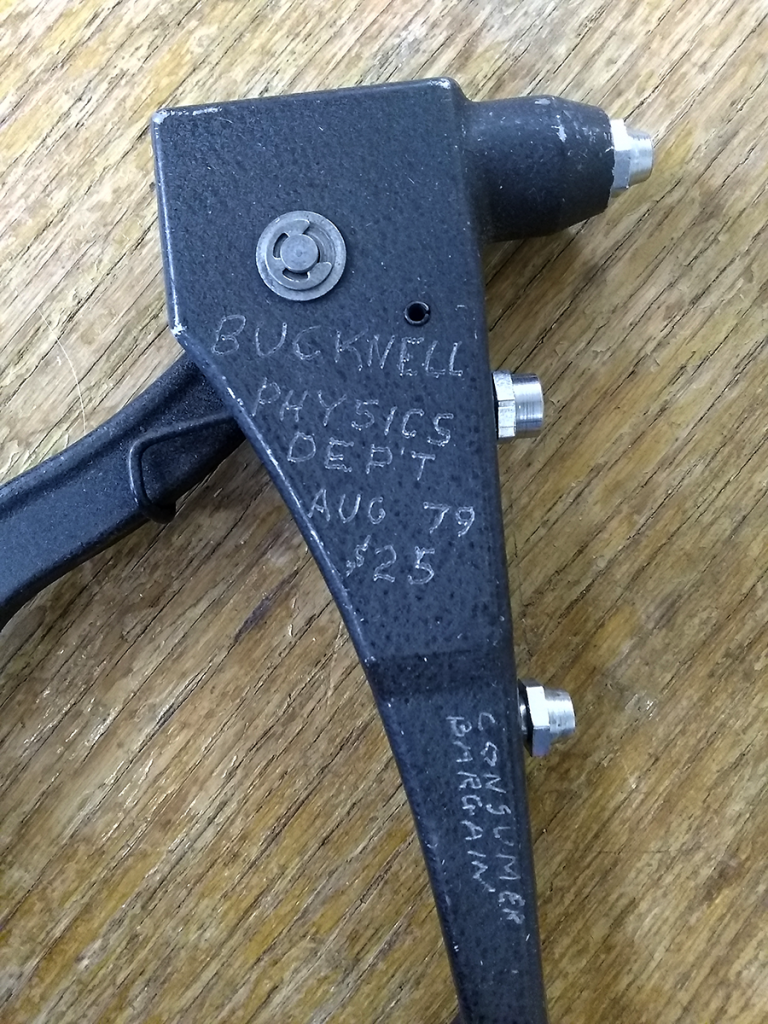
Note that the handle has also been etched with “Consumer Bargain,” which is cryptic and delightful. Clearly, this was a steal.
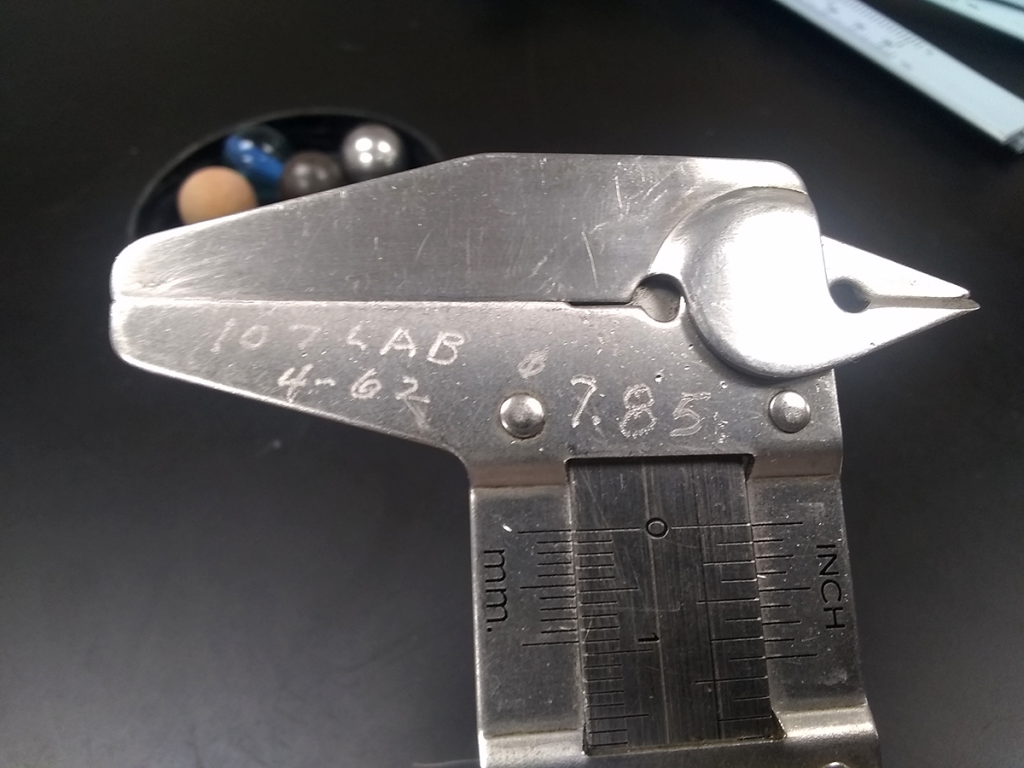
A reliable set of Vernier calipers, still working just fine. We use all manner of measuring calipers around here, with varying degrees of precision for different duties, but it’s nice to see the classics still performing well after six decades. Purchased in April of 1962, for the low, low price of $7.85.
Today’s dollars: $77.46.
Tools undergo a great deal of stress in doing their job. They wear down, dulling their edges. There are impacts, intended and not. There’s a lot of force, and heat, and effort in shaping raw materials into something more useful. Tools are generally made from hard materials, intentionally harder than the material they’re working. Harder materials, broadly speaking, are more brittle.
So they’re good, they’re good, they’re good… oops. Broken.
A lot of the shop’s milling and milling-adjacent tools are made of high-speed steel (HSS), a group of steel alloys which perform well at high temperatures without losing their temper. Tungsten carbide (often called carbide) is even harder, and we save those for jobs that need it. Carbide’s brittle enough that it can’t be used in hand tools, instead requiring a sturdier, rigid setup like a milling machine, a drill press, or even better, a CNC machine.
They’re awfully expensive to replace.
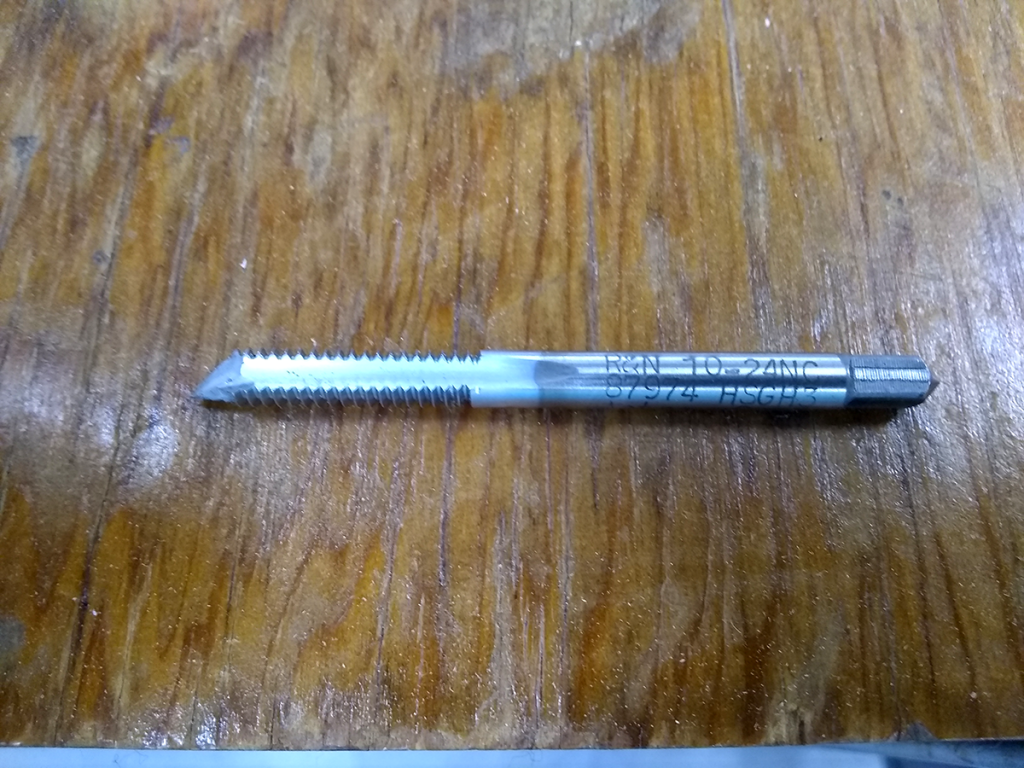
Some tools, though, require human hands and a deft touch. Taps are one such example. The action of cutting threads takes firm yet gentle pressure, with frequent pauses and reversals. The tap gets hot; the material gets hot. The corresponding thermal expansion makes the tap more and more difficult to turn, increasing the risk of fracture. Best be patient.
And sometimes, despite all that effort? The high-pitched *tink* that tells you the tap snapped. It’s subtly different from the similar sound that a curled, not-yet-removed burr of metal makes when the tap runs up against it. Sigh.
Reverse the tap, slowly, carefully. See if you can remove the broken piece without damaging the hole. Remember that it’s harder than the material it’s in, and probably as hard as the drill bit you’d like to use to dislodge it. If need be, drill a new hole and try again. This particular tap met its end putting threads into cast iron, a less-than-ideal material for most of our machining jobs.
Mistakes. They happen.
There are bits of information worth remembering, and others best outsourced to a handy reference. Preferably one that isn’t Wikipedia. Having a head crammed full of a broad swath of information is immensely handy in a shop with such wide-ranging activities. When an unexpected request comes through the door – and so many of them are unexpected – it’s refreshing to be able to approach the problem with at least some sense of which direction to take.
Even if you can’t pull up the specifics, knowing the outline of the process gets you started. A tiny dose of confidence helps, too. That and a willingness to give just about anything a shot. And, yeah, stuff gets broken sometimes.
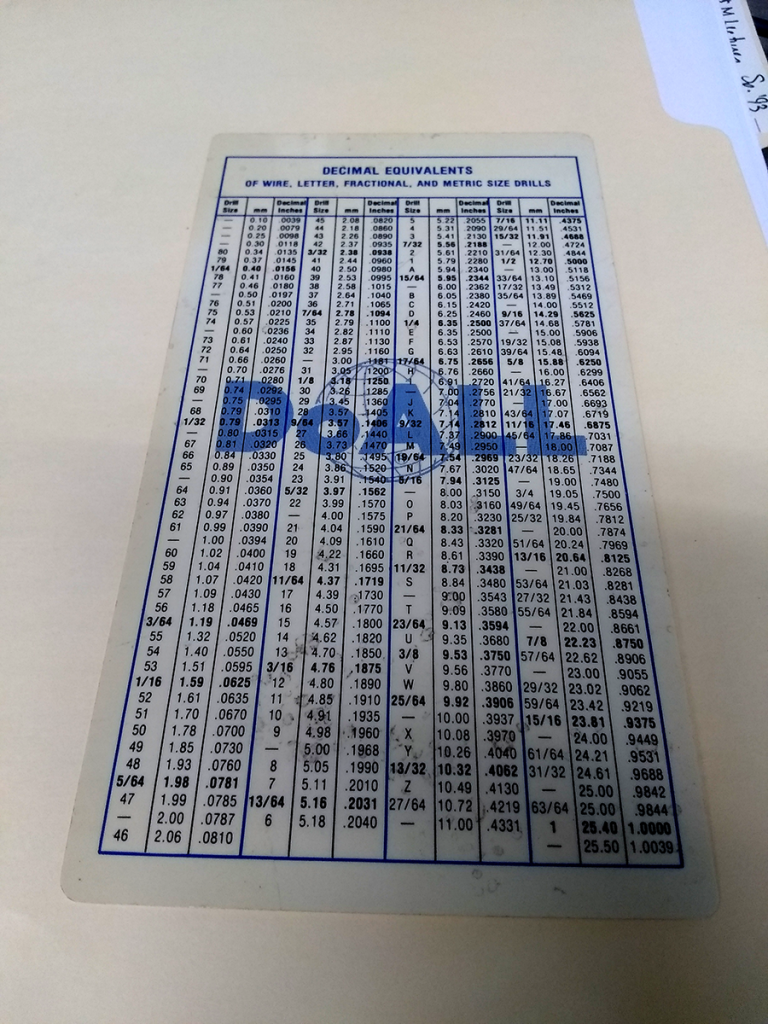
Mental outlines are good. Instant recall of key facts is useful. Sometimes, though, you need a big table of numbers, because by the time you’ve committed that mountain of stuff to memory, you’ll have forgotten why you were even trying in the first place.
A big table, but not so big it won’t fit in a pocket. (Side note: you will always be happy to have a spare pocket around here.) Side A lists drill sizes with their diameters in millimeters (to 2 decimal places) and in inches (to 4 decimal places). Fractional from 1/64″ to 1″. Wire from 80 to 1. Letter from A to Z. Metric from 0.10mm to 25.5mm. 206 in total. (Assuming you consider 1/4″ and E to be separate drill sizes. They’re identical, save for the markings on the shaft.)
It’s especially helpful when trying to find just the right size for a project. That 1/4″ plastic tubing that needs to fit snugly-but-not-too-snugly? The 1/4″ drill probably won’t work. Size G, with a spare 0.28mm, might.
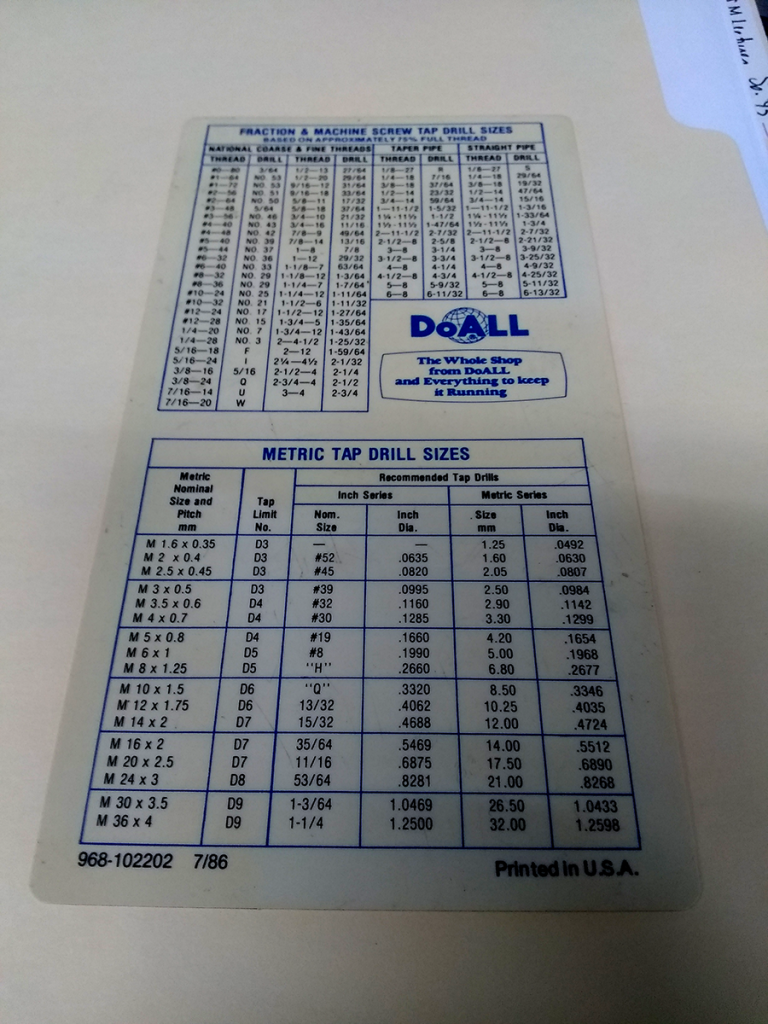
The B-side to this is a pair of tables that match up thread sizes – national coarse and fine; taper and straight pipe; metric – with the appropriate drill. The metric table even provides SAE alternatives should you find your metric drill selection somewhat less comprehensive than the full array of letters and wire numbers. Perhaps DoALL was more optimistic about an eventual shift to metric back in July of 1986.
Regardless, the table’s ease of converting between fractional inch, decimal inch, and millimeters is immensely useful in a shop where all three options might come into play. The availability of raw materials sometimes creates situations where you’ll work with both SAE and metric on the same job. It’s weird.
Honestly, here in the shop, we’d prefer to do everything in metric. Makes the mental math way easier.
Need to connect one thing to another? You have options. So many seemingly endless options. And, yes, digging through all of that will reveal treasures upon treasures, from more head drive styles than you can imagine ever needing – at least twenty-two – to nuclear-grade duct tape to plain old Elmer’s glue sticks. (We have yet to find a use for nuclear-grade duct tape around here, but glue sticks come in handy sometimes.)
Mechanical fasteners, specifically screws, see a great deal of use around here. Among other benefits, they’re easy to remove. When you spend your days making and modifying things, leaving open the possibility of taking an apparatus apart and swapping in a newer, better piece is reassuring. Sure, it means tapping a lot of holes instead of simply running a bead of adhesive. Trade-offs.
The variety of socket head screws alone can be mind-boggling. You could make an entire career out of just maintaining the ANSI standards on those things. Presumably someone does. Several someones.
For most jobs, alloy steel will do. Strong, inexpensive, and available in every length and thread imaginable. If it’s going someplace where it might get wet, zinc-coated provides corrosion resistance. Or upgrade to 18-8 stainless steel, which isn’t as strong but is more corrosion resistant. If it’s passivated, even more so. Black oxide if you want a matte-black finish; chrome-plated if shiny’s the thing. Silver-plated “have mild lubricity so they thread smoothly.”
New vocabulary word: lubricity.
316 stainless is more corrosion-resistant. A286 stainless are as strong as alloy steel, as corrosion-resistant as 18-8, and so expensive that they’re sold as single screws only. Save those for the next time you’re building an aircraft.
Then there are the other metals, each with special applications. That often includes resistance to corrosion from salt water or other chemicals, and if that’s where you find your project, get ready to do your homework. “Corrosion-resistant” is a big umbrella.
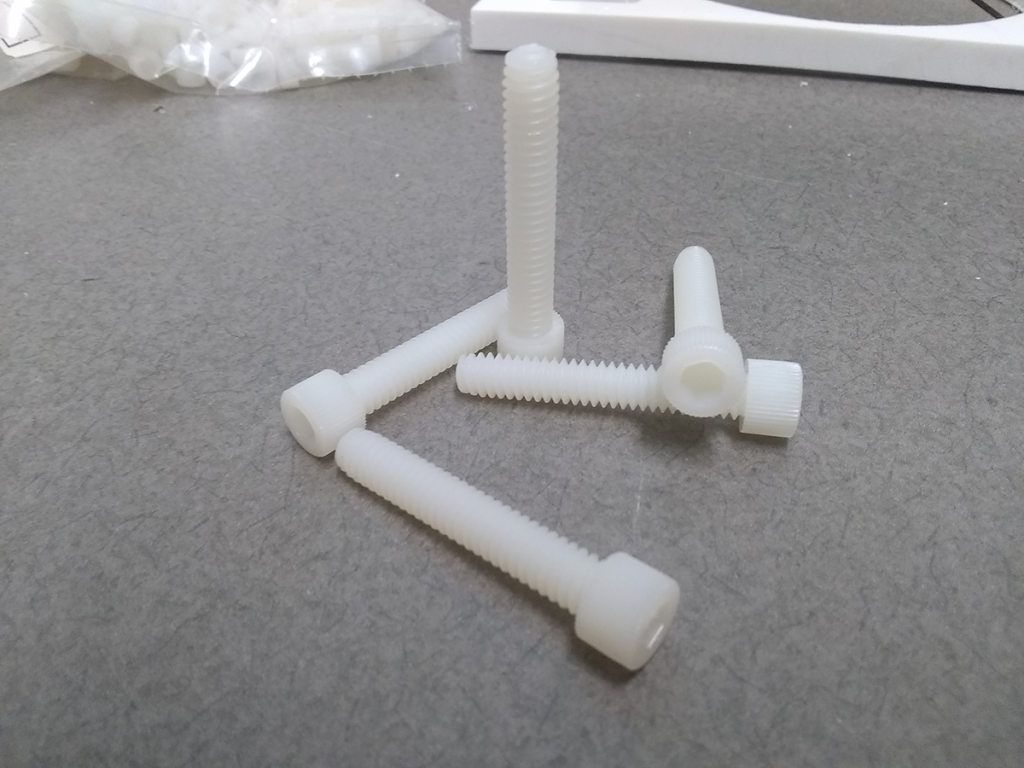
Sometimes you’ll get an even more unusual request: build a gizmo without any metal. Metals, especially ferrous ones, tend to cause trouble when working with magnetic fields, and physicists love them some magnets. Steel’s out. Brass, bronze, and aluminum are nonmagnetic, but are conductive enough to generate potentially disruptive eddy currents in a changing magnetic field. Could present a problem. That leaves plastic.
Plastic. The standard is nylon, which is strong, durable, and light. It may also expand when wet, so watch out for that. Polypropylene is more resistant to various chemicals and doesn’t swell in water, and you can expect to pay for those added benefits. Then there’s PEEK. Polyether ether ketone. Strong. Resistant to a whole array of chemicals. Happy up to 500° F. At several dollars per screw, you’ll know when you need one.
We keep the nylon ones handy.
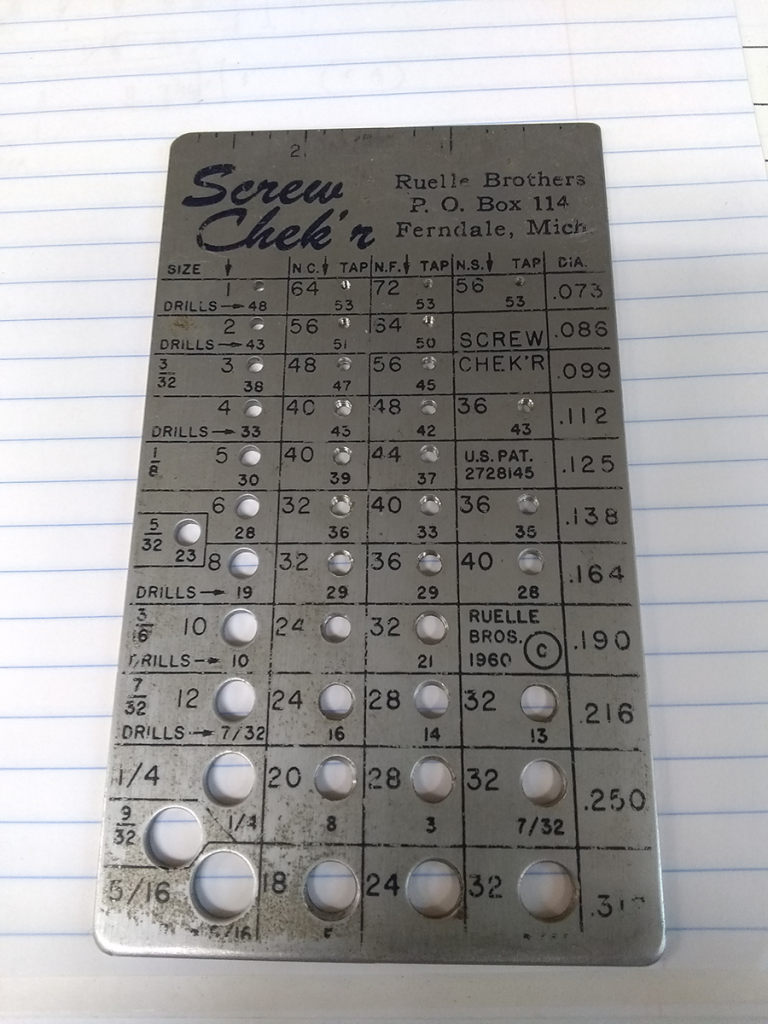
One of the ever-unfurling mysteries in the shop is this: what screw thread am I looking at? There are a multitude of reasons to pick one when designing an object, and while we’d all love for simplicity and consistency across a single piece of equipment, that’s not always the case. Hence, a precision-made piece of steel. Holes, smooth and tapped.
Smooth bores identify the screw size – SAE number standard or fractional inch – and are all marked with the corresponding drill size. For size 4 screws, number 33. For 1/4″ screws, a convenient 1/4″. In a moment of serendipitous coincidence, size 10 fits in a number 10 hole. All are marked in the right column with their diameter in decimal inches.
The threaded holes come in three flavors: N.C., N.F., and N.S. Sometimes N.S., at least. National Coarse, National Fine, and National Special.
Coarse threads are standard, and like all SAE threads indicate the number of threads per inch. (Metric threads use the pitch, or the center-to-center distance between threads.) If ever unsure, the answer is that it’s probably coarse thread. Double-check by seeing if it turns neatly into the hole.
Fine threads have certain uses, such as in locations where there will be a lot of vibration. More threads per inch means more contact area for the screw, and the increased friction helps reduce the screw’s ability to wiggle loose. For some reason, they never seem to wiggle in more securely.
Special threads show up in special situations, and are completely inconsistent across the range of sizes. Most are even finer threads, but #4-36 is even coarser, and #6-36 sits in between coarse and fine. Small fractional inch sizes don’t have special designations, and the small number sizes don’t… except for size 1.
Which is an uncommon screw size, to say the least. If we have any in here, they’re hidden away in some dark drawer. We do have a single #1-64 tap, so either they were around for a little project once, or a previous shop tech was very thorough in ordering tools.
Inspecting the Screw Chek’r more closely, you might notice that one of the tapped holes isn’t like the others. Several feel as though they’ve gotten a lot of use over the years – #4-40, #6-32, #10-32 – but poor, lonely #1-56?
No one has ever tried to thread a screw through that hole. There’s still a steel burr in the bottom.
It makes some sort of sense. #1-56 screws are rare as hen’s teeth these days. McMaster-Carr doesn’t carry any, and they have seemingly everything. A quick internet search will turn up hobbyists repairing early-20th-century equipment trying to locate replacement screws in that size. Even a glance at Ruelle Industries’ most recent versions of the Screw Check’r reveal that they don’t even put that thread size on anymore.
Of course, if you can’t find the precise screw you need, that’s what a metal lathe is for…
We field a lot of requests for small objects in the shop these days. It’s not that there aren’t plenty of big/huge/enormous things worthy of serious research and scholarship (see: stars), but physics sometimes gets wild when you go small. And not even quantum mechanics small… that’s where calling physics not intuitive doesn’t even begin to cover it.
We’re talking channels and structures where 100 microns makes a difference. A micron, or micrometer, is one-thousandth of a millimeter; 100 of them is a tenth of a millimeter. In the general ballpark of the width of a human hair. It’s the scale where you learn the finer points of a tool’s tolerances, where you set a machine to do the work and wait until it’s all finished to figure out if it worked.
Mistakes happen.
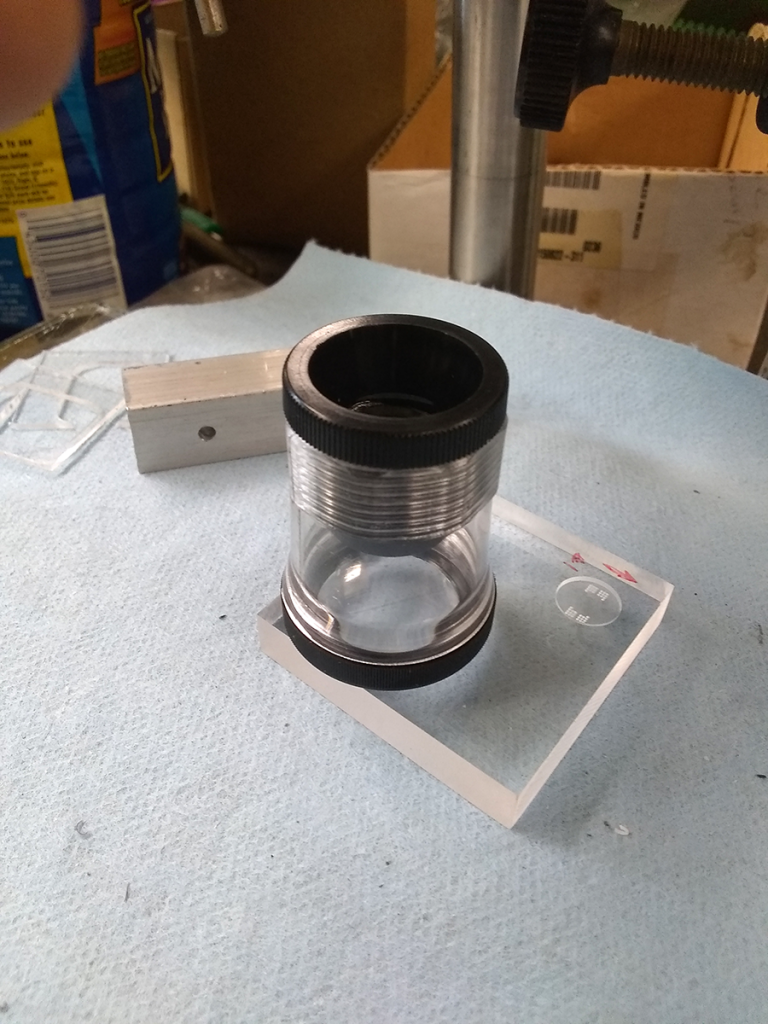
Very tiny things also defy your eyes’ ability to inspect them, so we rely on microscopes and other optical magnifiers to check on the quality of work. One of the handiest is the magnifier shown above, a Bausch + Lomb Hastings Measuring Magnifier. It uses a Hastings triplet lens system, composed of three separate glass lenses bonded into a single, composite lens. Doing so produces crisp, distinct images without distortion. At the end it has a scale, so that we can press it against an object to inspect and actually measure features less than a millimeter across!
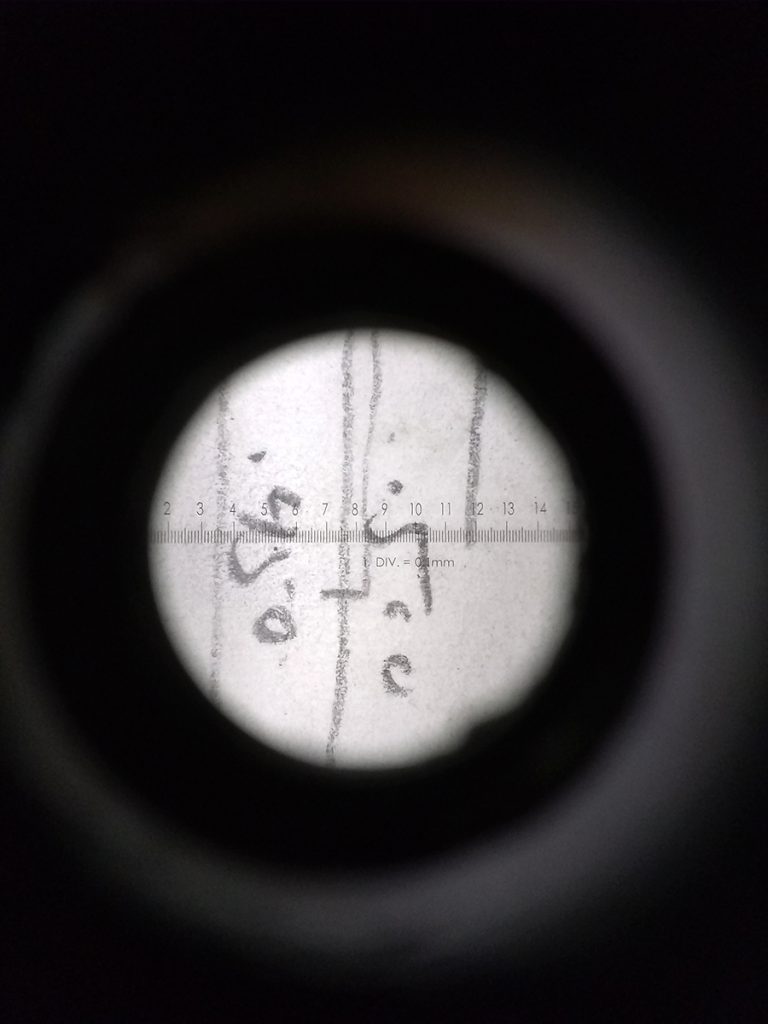
One of the best features of this magnifier is its portability. At 7X magnification, it’s less powerful than a microscope, but its case fits in a pocket, so it can go anywhere. Clear plastic sides admit plenty of ambient light, removing the need for additional illumination that a microscope requires. You simply pick it up, inspect your object, and carry on. Confirm that microfluidics channels are the proper width. Ensure that you’ve cleaned all the swarf away from tiny features. Examine tools up close for minor damage to their edges.
Or check out the tiny world all around you, just because you can. Some of the best science starts with noticing something neat, and just digging deeper.
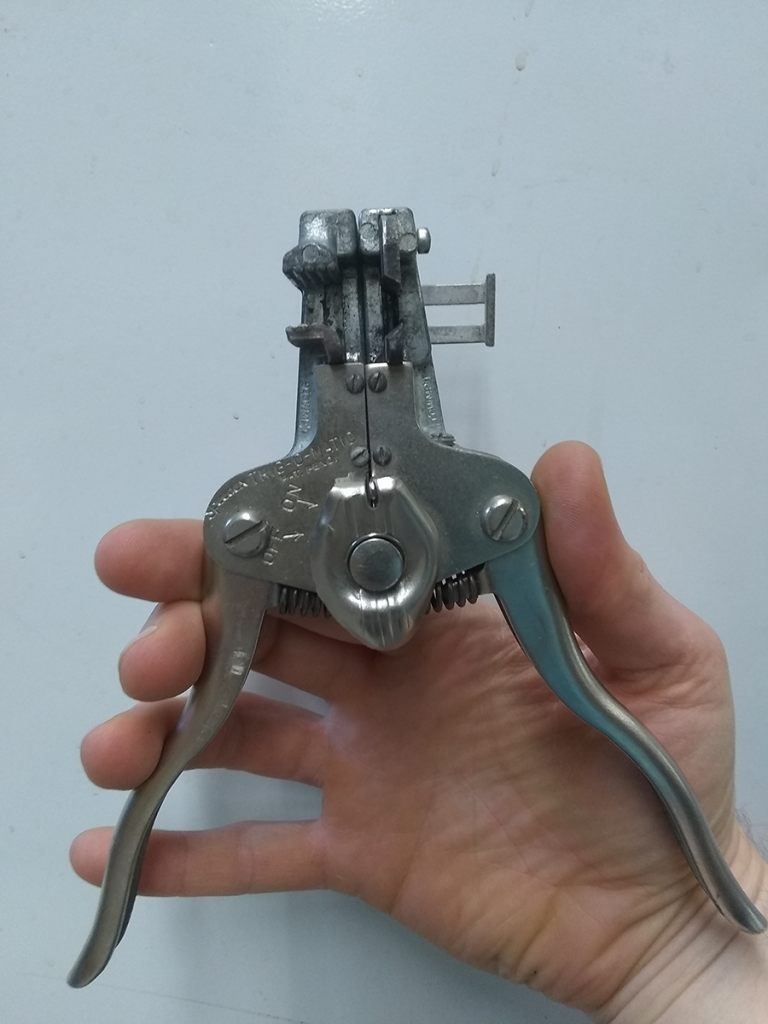
With enough drawers, boxes, bins, and dark corners in our shop and storage rooms, you’re bound to run across the occasional tool that you wish you’d known about sooner. Maybe it’s useful. Maybe it’s fiercely specific. Maybe it’s just a special sort of ingenious. Maybe it’s a pair of squeeze-and-strip wire strippers.
We have several pairs, but only this one is dubbed the Speedex TRIG-O-MATIC. Nothing like a glorious Space Age name to capture that little extra bit of attention.
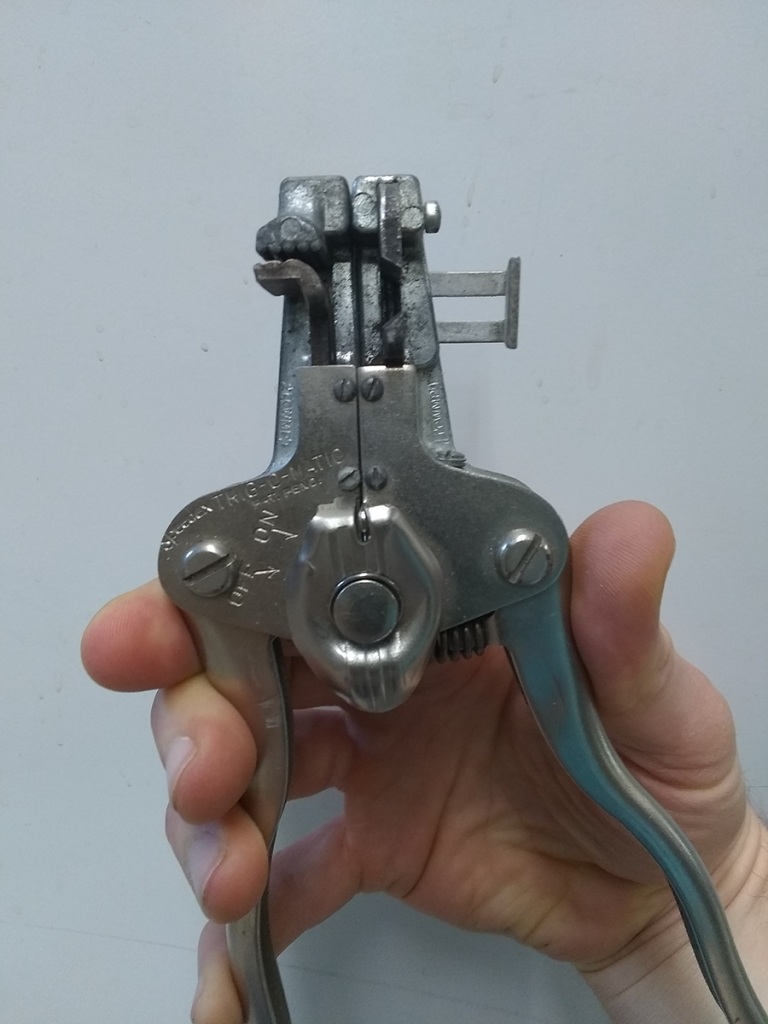
Feed an insulated wire through the clamps – or several, once you’ve had a bit of practice – up to the adjustable guide. As you start to squeeze the handles, the left-side clamps gently grasp the wires, holding them steady. Then the notched blades close, cutting through the insulation surrounding the wire. The last step in this little dance splits the tool down the center, pulling wire and insulation in opposite directions, effortlessly.
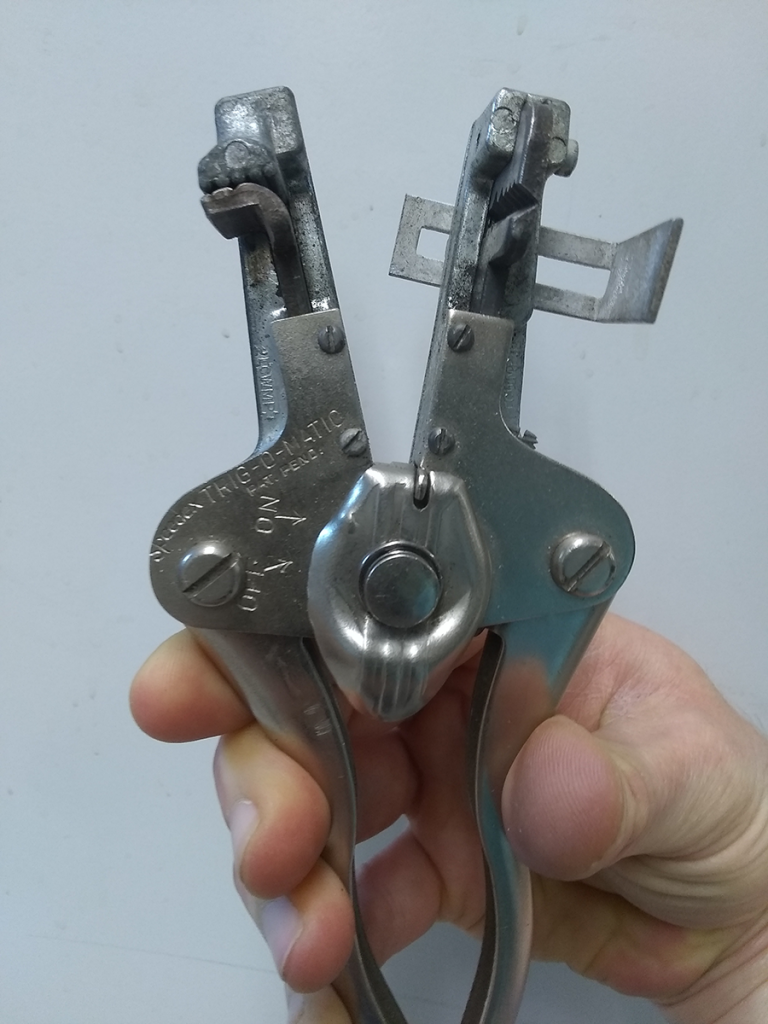
Cleanly stripped wire, courtesy of the two ugliest birds you’ve ever seen. (What two-headed oddity do you see in that picture?)
At this point, you may be wondering when a relatively complicated gizmo like this would be worth having. After all, it has a lot of moving parts, and the more parts something has, the more parts it has that can break. A pair of basic wire strippers, or even just a pair of pliers with wire snips can do the job quickly and cleanly. Right? Well, there are two situations when this little tool is just the bestest thing ever.
1) When a novice needs to strip a few wires and doesn’t need to spend the time (and mistakes) to learn good, practiced technique. We were all there once.
2) When it’s time to put together toy kits for PHYS 212, and all of those lengths of wire* – each with two ends! – need to be stripped and tied. After a while, you get very good at clipping several at once, until it becomes a game to see how many you can manage. Yes, there’s a ceiling.
Toy kits! A subject for a future post: each semester, we put together hundreds of packs for the PHYS 211 and 212 students, full of odds and ends to use for problem sessions. They’re wondrous assortments of odds and ends (and honest-to-goodness toys!) that illustrate the principles of physics through just being neat-o.
* Cutting hundreds of pieces of wire to a specific length is its own problem, and there’s a shop-made solution for that. If you have to do a job a dozen (or a couple hundred) times over, build a jig!